Hello friends,
For those of you who love baby wearing and want to keep your baby warm and toasty on you throughout the cold and freezing weather, today I want to share with you a couple of makes that have made Canadian winter babywearing a positive experience.

A jacket extender + a wrapping blanket to keep your baby outings warm and cozy.
Cocoon jacket extender
Ok, if you want to make a jacket extender you have to first find a zipper or a closure that exactly matches your winter jacket*.
- Zipper
My jacket has a zipper, so I went ahead and asked Mrs Fisher to sell me a compatible zipper. If you use a zipper, you will most likely want a 2-way separating zipper of the same teeth size and length as your jacket. If you live in Montreal, you should visit Mrs Fisher‘s for general culture, because she is just adorable and because she has a large stock of zippers. Other good resources are Canzip if in Canada and Zipperstop if in the US.
*Please make sure you test and know that the zipper you want to use meshes easily with the zip in your jacket (ask me how I know!).
- Fabric
I used a laminated impermeable-fleece fabric from Globetex. The picture below shows the impermeable side of the fabric as well as the fleece side of the fabric. In the fabric I got, these two sides are fused together. You can used the same type of fabric, or otherwise, separate impermeable and fleece fabrics.

For my Cocoon, I used 2 layers of laminated impermeable-fleece. The outer layer of my extender shows the impermeable side and the inner layer shows the fleece side.
If you have separate impermeable and fleece fabrics, you could potentially do an outer layer of impermeable fabric and two layers of rather thick fleece.
The process:
I wanted my Cocoon to be roomy and comfy for Emilia, so I decided to work with the shape and dimensions illustrated below.
Start by tracing a horizontal line longer than your zipper length (in blue). We’ll draft the neck side on the right of the line and the bottom of the extender on the left.
Trace a pattern that resembles the following:

- Make sure that the zipper length measures the same as the red line you traced.
- The blue line would now be your Center Front and you would cut on the fold.
- Add seam allowances (5/8″ if working with home sewing machine).
- Cut this piece 2X on the fold using laminated impermeable-fleece.
I was a little worried that the zipper would be too curved and wouldn’t fit propperly on the jacket, so I decide to reduce the curvature of the zipper line and bow out the center front line.
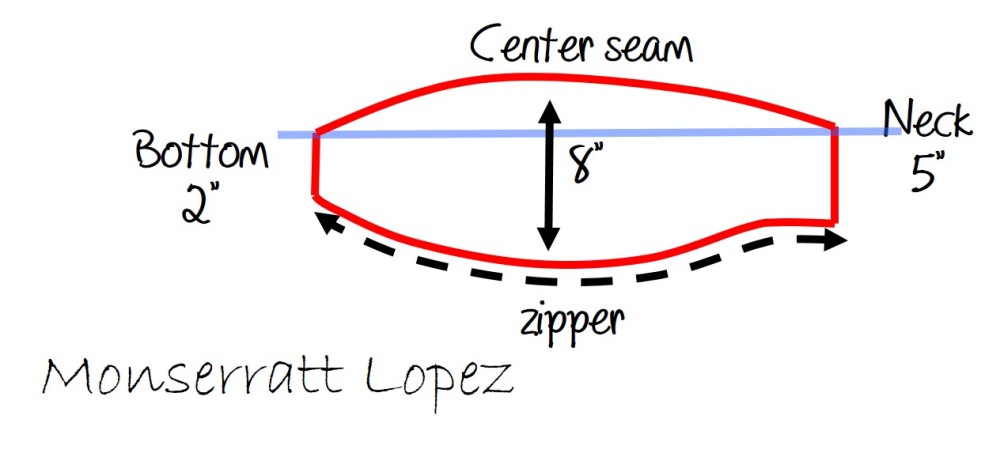
If you do this, you will join 2 pieces of fabric along the center seam line to make the outer layer and 2 pieces for the inner layer (you will need 4 pieces of fabric).
- Top stitch the center front seams
I then proceeded to:
- Sandwich the zipper between the inner and the outer layers with the right sides together.
** BEFORE SEWING ANYTHING ELSE, MAKE SURE THAT THE RIGHT SIDE OF THE ZIPPER WILL BE PROPERLY POSITIONED TO ZIP WITH THE RIGHT SIDE OF THE JACKET ONCE TURNED INSIDE OUT.**
- Sew along one zip line, the bottom and the other zip line, leaving the neck side open to turn the sandwich inside-out.
- Topstich for a clean finish.
If this makes sense, now you understand what you are looking at in this picture.

Here a few more pictures that may provide some help:


After a few uses, I realized that Emilia’s feet were getting a bit chilly and so I decided to make a wrapping blanket to protect her feet from getting cold. It also serves to to prevent any loose shoes from getting lost as well.
Wrapping blanket
Because we have a couple of different carriers, I wanted to make a baby feet cover that could be compatible with both. In the end the design I made turned out to be very simple but effective. You can use this with any baby carrier.
I made it using a double layer of fleece and a layer of quilting cotton for a more interesting main fabric.
The design is as follows:
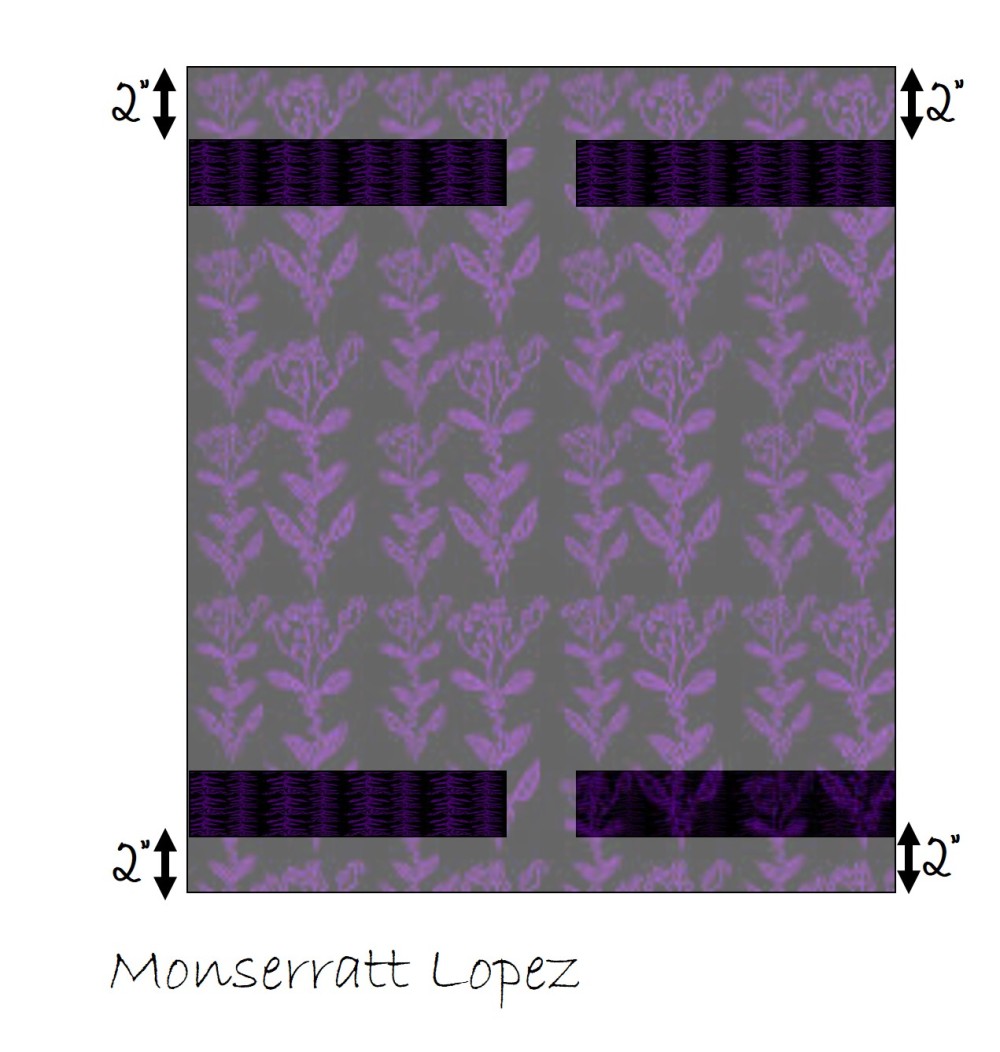
There are 4 straps that attach to the main body of the blanket and the blanket, which I made out of 2 layers of fleece and 1 layer of quilting cotton.
- Cut 8 pieces of the main fabric (quilting cotton) for the 4 straps
- Cut 1 piece of main fabric (blanket dimensions)
- Cut 2 pieces of fleece (blanket dimensions)
Process:
- Sew the straps along the long -short- long edges
- Turn straps inside and top stitch
- Baste the straps 2″ above the edge of the blanket as illustrated below:
- Sandwich:
- the first blanket of fleece
- the blanket in main fabric
- the second blanket of fleece
- Sew together all the layers along most of the edge, leaving a 10″ opening to turn the sandwich inside out.
- Stich closed the opening
Voila!
Now, for the bundling:
Place your baby in your carrier, snuggle and then strap the blanket along your waist and below your babie’s legs as shown in the pictures.
Now, David and Emilia demonstrate how to wrap the blanket to cover your baby’s feet in the carrier with Emilia facing forward:


and Emi and I demonstrate the same in a different carrier with baby facing inwards:


Zip your extension to one side of the jacket, wear it and zip it up!


Note: to zip up more easily, you can open a little bit the oposite side of the zipper at the bottom of the jacket.
For extra security while walking on ice and snow, wear spikes on your shoes!
I hope you find this info useful!
Do you like baby wearing? Did/do you baby wear outside or on your trips? Do you have snowy winters?
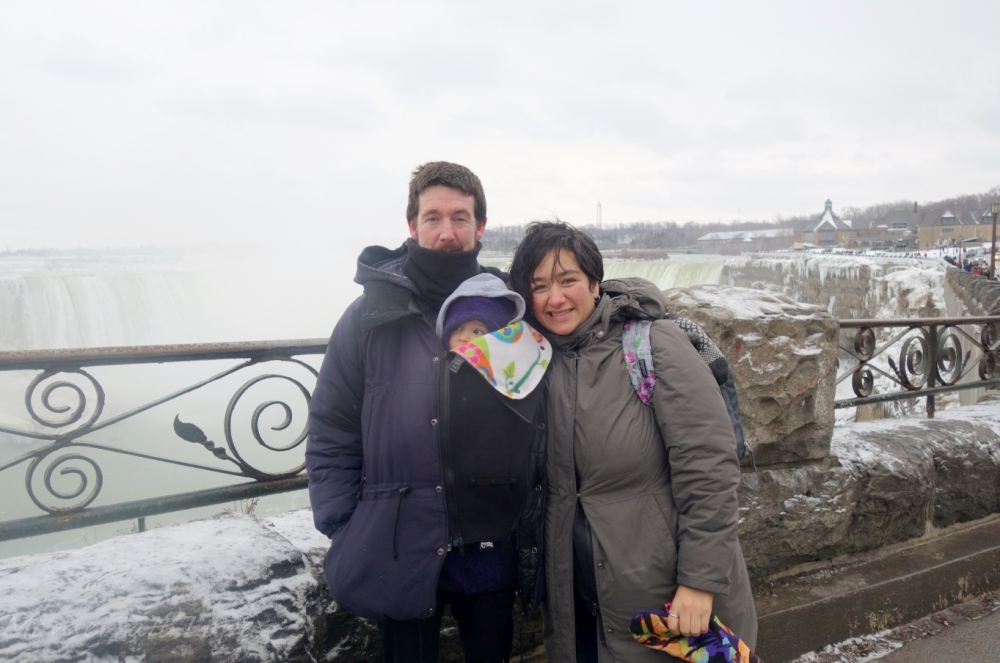
Happy winter snuggles, strolls and trips friends!! Greetings from Niagara Falls!!

❤
M
In the last picture David is wearing a commercially available jacket extender by MakeMyBellyFit.

How clever! Well done.
LikeLiked by 1 person
Thanks Brenda! 🙂
LikeLike
I can see the appeal, especially in cold climates.
My first baby loved to be carried everywhere. The second grew rapidly and was too big for the carrier within 2 months. I had lower back and abdominal issues with number 3, and was that a carrier would exacerbate them.
LikeLiked by 1 person
Yeeeeiiiii! 3 babies! I know, fast growers can get heavy pretty quickly ! At least you got to carry them for a bit.
LikeLike
You’re so clever! And all three of you look so adorable and happy 🙂 I lover reading the post and adoring you in the pictures 🙂 :-*
LikeLiked by 1 person
🙂 gracias Kat!
LikeLike
Wonderful!
LikeLiked by 1 person